

Season 17:
Manage every minute
Substitutions. Custom training. Match energy. Red card plans. And a reworked match engine underneath all of it. Your players tire as they play, your bench decides games, and every session your squad runs is one you set. This is the deepest MFL has ever let you go into managing a football club.
You are in charge of more
Picking the eleven has always been the job. Season 17 hands you the rest of it: how your squad trains every day, who sits on your bench, when they come on, and what your team does when it all goes wrong.
A lot arrives at once, and the bigger features were built to work together: substitutions come in the same season as match energy because one is the answer to the other.
Training is how you turn up ready, and the first piece of a club that is built rather than signed. Match energy is why the last half hour decides games. Substitutions are how you win it. Red card plans cover the one thing nobody sees coming. And there is a pile of match-day improvements on top of all of it.
tl;dr
Split your squad into training groups
- Hire coaches: Basic ones free, better ones for a revenue share or an upfront $MFL fee
- Assign a coach to each group to focus development on specific attributes
- Set each training group's intensity: harder training drains energy, lighter training restores it
Custom Training
Your players have always trained. Every day of the season, whether you were watching or not, quietly accumulating progress until an attribute ticked up. It was the one part of running a club you had no say in.
Season 17 hands it to you. Split your squad into groups. Put a coach on each one. Tell them what the session is for.
Your strikers can spend a season sharpening their finishing while your back line works on defending. When the fixtures pile up, you can ease a group off so they come through the week fresh.
Switching it on takes one action and gives your club three groups with free coaches already in place, set to ordinary all-round sessions, the same training they run today. Leaving it off changes nothing at all. Your players keep developing exactly as they do today.
Training is one half of how a player develops. The other half comes from playing matches, and things outside training shape how fast anyone progresses at all: his age, his rating, and how he compares with his teammates. Those are covered in the main guide under Progression and XP. This page is about the half you now control.
- Where
- Your club, Training section. Three tabs: Training for groups, My Coaches for staff you've hired, Recruit for hiring.
- When it runs
- Once a day at 08:00 UTC, only while the season is in progress. That is 29 sessions across a season. Whatever your setup is at that moment is what applies.
- You start with
- 2 outfield groups and 1 goalkeeping group, free and permanent, plus free Basic coaches assigned to them.
- Who can change it
- The club owner, or a manager whose contract grants the training permission.
- What you set
- Per group: which players are in it, which coach runs it, its focus, and its intensity.
- Changing your setup
- Free, instant and unlimited. Move players, swap coaches between groups, change a focus or an intensity as often as you like. Only new groups and new coaches cost anything.
Set it up
- Open Training on your club
You'll see your groups as cards. Each card holds a coach, its settings, and the players assigned to it.
- Move players into groups
Drag a player from one group to another, or click to select several and move them together. Goalkeepers can only go into goalkeeping groups, and outfield players only into outfield groups.
- Give every group a coach
Pick from the coaches you've hired. A coach runs one group at a time, so assigning him to a new group leaves his old group without one.
- Choose focus and intensity
Focus decides which attributes the group works on, intensity decides how hard. Both are per group.
- Save
One save applies every group at once.
Shooting Coach 2
- 1The group's name. Rename it to whatever suits how you organise the squad.
- 2The coach running it, with his tier and specialty. One coach per group.
- 3Focus. A coach with two specialties lets you pick one or both.
- 4Intensity, from low to high.
- 5The result: which attributes speed up and which slow down. Below it are the group's players. The percentage on each row is that player's energy.
Training groups
A group is a set of players who share one coach, one focus and one intensity. Everything in training is set per group, never per player.
- Free groups
- 2 outfield and 1 goalkeeping. They work in every division, whatever happens to your club. Only purchased groups can lock, covered under Unlock more groups.
- Maximum
- 6 outfield groups and 2 goalkeeping groups, buying the extras with $MFL.
- Goalkeepers
- Train in their own groups with their own coaches. They never share a session with outfield players.
- Unassigned players
- Players are placed in a default group automatically, so nobody trains without one. Move them around however you like.
- No coach
- Nobody stops training. A group whose coach's contract has ended runs an ordinary balanced session: no focus, and intensity treated as normal. You cannot save a setup that leaves players in a coachless group, so this only arises when a contract runs out mid-season.
Coaches
A coach is a member of staff you hire and put in charge of one training group. His tier and his specialty are what decide the work that group can do.
A better outfield coach does not develop players faster overall. He shifts more of their development onto his specialty. The table below shows the bonus. The Focus section shows what it does.
Outfield coaches
| Tier | Specialties | Focus bonus | Salary |
|---|---|---|---|
| Basic | None | No focus. Every attribute develops at its normal rate for the position. | Free |
| Standard | A primary and a secondary attribute | +25% on the primary, or +15% on each of the two | 2% revenue share |
| Elite | A primary and a secondary attribute | +50% on the primary, or +35% on each of the two | 5% revenue share |
Specialties are fixed on the coach and cover the six outfield attributes: Shooting, Passing, Dribbling, Defense, Pace and Physical. You cannot teach a coach a new one.
Goalkeeping coaches
Goalkeeping groups have no focus to choose, so goalkeeping coaches come in two kinds rather than three: Basic and Elite. There is no Standard tier for keepers.
A Basic one runs balanced sessions. An Elite one develops Goalkeeping 5% faster, and unlike an outfield focus, this one is genuinely extra rather than taken from elsewhere. It is the only place in the whole system where coaching creates development rather than moving it.
Hiring
Hire from the Recruit tab. You can filter the entire pool of coaches by tier and by specialty and compare salaries before signing. Every club recruits from the same pool, and hiring a coach does not take him off it: the same coach can work for any number of clubs at once. Coaches are staff on contract, not assets you own, and you only ever need one per group.
Paying them
You choose at signing, and the choice is fixed for that contract:
- Revenue share. Nothing upfront. The coach takes a percentage of your club's earnings, 2% for Standard and 5% for Elite.
- Upfront $MFL. A one-off fee for the season. You then keep all of your earnings.
Contracts and assignment
- Moving a hired coach between your groups is free and instant, any number of times.
- One coach runs one group at a time. Assigning him elsewhere leaves his old group without a coach, so give that group someone else or empty it before saving.
Focus
Focus is the instruction you give a group. It is the attribute, or the pair of attributes, that its coach concentrates the work on.
Before any coach is involved, a session already develops all six outfield attributes at once. How fast each one develops depends on the player's position: the attributes that matter most to it develop fastest. Every attribute develops at least a little, including ones that add nothing to his overall.
Focus changes the balance between them. A training week only has so many hours, so whatever a focused attribute gains, the others give up equal amounts, not equal fractions of their own speed. A coach moves development around. He never adds any.
A specialist coach gives you two options per group:
- Primary only. The whole bonus goes to his primary attribute.
- Dual. A smaller bonus goes to both his primary and his secondary.
What a focus changes in practice
Take a striker on normal intensity. Each figure below is how fast that attribute develops compared with the same player under a balanced session, which is the 100% line.
| Coach and focus | SHO | DRI | PAS | PAC | PHY | DEF |
|---|---|---|---|---|---|---|
| Basic, no focus | 100% | 100% | 100% | 100% | 100% | 100% |
| Standard, Shooting | 125% | 94% | 92% | 92% | 91% | 90% |
| Elite, Shooting | 150% | 88% | 84% | 84% | 83% | 81% |
| Elite, Shooting + Dribbling | 135% | 135% | 74% | 74% | 72% | 69% |
Two things to read off this. A dual focus is not two single focuses at once: it lifts both attributes less than a single focus lifts one, and the other four give up more for it. And the attributes that slow down the most are the ones that were already developing slowest, because the others give up equal shares, not shares in proportion to how fast they were developing.
The same focus on a different position
What a focus changes depends on whether the player's position uses the attribute it targets. The same two coaches on a centre back:
| Coach and focus | DEF | PHY | DRI | PAS | PAC | SHO |
|---|---|---|---|---|---|---|
| Basic, no focus | 100% | 100% | 100% | 100% | 100% | 100% |
| Elite, Defense | 150% | 84% | 81% | 79% | 78% | 77% |
| Elite, Shooting | 96% | 93% | 92% | 91% | 90% | 150% |
Shooting counts for 0% of a centre back's overall, so the bottom row spends a season making him 50% faster at the one thing that cannot raise his rating, and slows down everything that can, Defense included.
Goalkeepers
Goalkeeping groups have no focus setting. A keeper's session goes entirely into his Goalkeeping attribute, and an Elite goalkeeping coach adds 5% on top of it.
Intensity
Intensity is how hard a group works, set to low, normal or high. It is the same setting for everyone in that group.
It is free and changeable at any time, and it is the only training setting that touches energy. Coaches never affect energy.
It is also the only way to put energy back into a player who is still playing. Rest only comes on days he sits out. A low intensity session gives him some back on a day he plays: each session recovers 20% of whatever is still missing, so a player on 70% reaches 90% across five of them.
| Intensity | Training speed | Energy |
|---|---|---|
| High | +20% | Loses 1 percentage point, plus 10% of the energy he is missing |
| Normal | Baseline | No change |
| Low | -20% | Recovers 20% of the energy he is missing |
Because both figures are based on missing energy, the effect changes with how fresh the player is. A fresh player barely loses anything on high intensity, and a tired player barely gains on low. Actual values:
| Energy before | After a high session | After a low session |
|---|---|---|
| 100% | 99% | 100% |
| 90% | 88% | 92% |
| 70% | 66% | 76% |
| 50% | 44% | 60% |
| 20% | 15% | 36% |
Energy never falls below 15% from training and never rises above 100%.
Energy
This is your player's energy, the number that drops when he plays and climbs back when he rests. Training checks it before every session, and a tired player earns nothing from one.
Energy is drained by playing matches and by high intensity training, and restored by resting and by low intensity training. Two other numbers matter here:
- Sitting a match out recovers energy. A player left out of the squad recovers 65% of his missing energy when that match ends, exactly as he does today. A player you name on the bench and never use recovers too, but less of it. Players close to retirement recover less than both.
- Five tired starters invalidate a lineup. If five or more of your starting eleven are below 60% energy, that formation cannot be used. Bench players are never counted, so naming a tired substitute can never block a lineup.
Training and matches draw on the same energy. A player on high intensity who also starts a match that day is drained by both, so a squad playing frequently has less room to push hard in training than a squad that is resting. For how energy behaves outside training, see Energy and Rotation.
Unlock more groups
A group beyond your free three is a facility you buy for the club with $MFL. You buy it once and keep it.
You can unlock up to 4 more outfield groups and 1 more goalkeeping group with $MFL. Every purchase is one-time and permanent.
Squads change and divisions change. A training facility is the first thing you can buy that becomes part of the club itself and stays there. It cannot be sold, removed or downgraded. It survives relegation. Pay to raise its band later, covered below, and that upgrade is permanent too, whatever your division does afterwards. Buying one changes what the club is rather than what its season looks like: years from now, with a different squad in a different division, the facility is still part of it.
Groups are tied to a division band
Divisions are paired into five bands. A group you buy is tied to the band you bought it in. It works in that band and in every band below it. If your club climbs above it, the group locks until you pay to upgrade it. A locked group cannot hold a coach or players, and it is never deleted or downgraded.
| Band | Divisions | A group bought in Bronze or Iron |
|---|---|---|
| 1 | Diamond, Platinum | Locked until upgraded |
| 2 | Gold, Silver | Locked until upgraded |
| 3 | Bronze, Iron | Bought here, usable |
| 4 | Stone, Ice | Usable |
| 5 | Spark, Flint | Usable |
A group never trains better or worse than another. The band decides whether you can use it, nothing more. Quality comes from the coach you put in it.
- Getting promoted locks nothing permanently. Pay the difference to the higher band and the group is usable again.
- Getting relegated unlocks it again at no cost, as soon as your division is back within the group's band.
- Upgrades are kept forever. Once a group is upgraded to a band, it stays at that band whatever happens to your division afterwards.
Everyone can see your setup
Your club page shows your groups and the coaches you have hired to any visitor. Which players are in which group, and what your coaches are paid, stay private.
Prices
Two things cost money: unlocking or upgrading a group, and a coach's salary. Everything else about training is free.
Extra groups
Priced by your current division band and by how many groups of that kind you already own (bands are explained under Unlock more groups).
| Band | 1st purchase | 2nd | 3rd | 4th |
|---|---|---|---|---|
| Spark, Flint | 1,500 | 2,500 | 5,000 | 5,000 |
| Stone, Ice | 2,500 | 5,000 | 10,000 | 10,000 |
| Bronze, Iron | 7,500 | 15,000 | 25,000 | 25,000 |
| Gold, Silver | 20,000 | 40,000 | 75,000 | 75,000 |
| Diamond, Platinum | 50,000 | 100,000 | 200,000 | 200,000 |
Upgrades
Upgrading costs the difference between the two bands' prices, so buying in a low band and upgrading later never costs more than buying in the high band directly.
| Upgrade | 1st purchase | 2nd | 3rd and 4th |
|---|---|---|---|
| Spark/Flint to Stone/Ice | 1,000 | 2,500 | 5,000 |
| Stone/Ice to Bronze/Iron | 5,000 | 10,000 | 15,000 |
| Bronze/Iron to Gold/Silver | 12,500 | 25,000 | 50,000 |
| Gold/Silver to Diamond/Platinum | 30,000 | 60,000 | 125,000 |
Coach salaries
Paid per season. Either a revenue share, or the equivalent as an upfront $MFL fee based on your division's 8th place league payout.
| Division | Basic | Standard (2%) | Elite (5%) |
|---|---|---|---|
| Flint | Free | 13 | 33 |
| Spark | Free | 27 | 68 |
| Ice | Free | 56 | 140 |
| Stone | Free | 120 | 300 |
| Iron | Free | 240 | 600 |
| Bronze | Free | 500 | 1,250 |
| Silver | Free | 1,040 | 2,600 |
| Gold | Free | 2,200 | 5,500 |
| Platinum | Free | 4,500 | 11,250 |
| Diamond | Free | 9,400 | 23,500 |
Upfront prices in $MFL, per season. Each coach is paid once per season, by one method or the other, never both. Goalkeeping coaches have no Standard tier.
Limits
A short list of the things managers most often expect training to cover, and whether it does.
- Retrain a position
- No. Training changes attributes, not positions.
- Train past potential
- No. Once a player's overall reaches his potential he stops gaining attribute points, however he is trained. See Potential and Longevity.
- Save a setup as a preset
- No. You set each group directly, and all groups save together in one action.
- Own a coach
- No. Coaches are staff on season contracts, not assets.
- Focus on an attribute your coach lacks
- No. The coach's specialties are fixed. Hire a different coach for a different focus.
- Let someone else run it
- Yes. Training is a manager permission, like tactics. Grant it on a manager's contract and they can run your training.
tl;dr
Name a bench of up to seven substitutes
- Write your substitution rules before kick-off: by minute, scoreline, energy, rating or a yellow card
- The match carries them out, up to five changes
- Benched players also earn XP even if they don't come on, and a short appearance takes almost no energy out of a player
Substitutions
Your eleven played the whole match, every match. Season 17 gives you a bench of seven and the rules that bring them on.
You are not clicking buttons live. MFL has managers in every timezone, with real lives around the game, and a match has never needed you online to be played well. Substitutions keep it that way, and they fit how the job actually works: you decide before kick-off, your staff carry it out on the day. An hour in, legs going and a goal down, the change you wanted is already happening.
A plan can watch the clock, the scoreline, or the player himself, so a bad game or an early booking is something you can cover in advance.
You may make five substitutions in a match.
The bench
Seven slots, filled from your squad. A player on the bench is there to come on, and he is part of the matchday whether he does or not: he earns XP for being there, and he recovers a little less than a player you left out. Training closes that gap again, since a group on low intensity returns energy every morning. See the match energy tab for the numbers.
Fill as many slots as you want. Seven, three, or none.
Your bench does not need to be as good as your eleven. A fresh player a few points worse than the man he replaces can still be an upgrade on tired legs.
What sharing a shift does
Take a striker off after an hour and he has done an hour's work, not a full shift. His replacement gets a run-out of twenty-odd minutes, short enough that it takes almost nothing out of him. Between them they covered the position for ninety minutes without anyone playing a full match.
So sharing a position does not split the load in two. It shrinks it, and both players earn XP for taking part.
| One position, 90 minutes | Energy used | XP earned |
|---|---|---|
| One player plays all 90 | 100% | A full start |
| A starter and a substitute share it | 62% | More than a full start alone |
Energy is measured against one player doing the full 90. Where you make the change barely matters: 65 and 25, 60 and 30, or 45 and 45 all come out the same, as long as the substitute gets a proper run-out.
Writing a substitution plan
A plan is a rule. When something is true, make a change. Three steps.
- When?
Use any of these, or all of them. A minute to wait for: 15, 30, 45, 60 or 75. A scoreline: level, ahead or behind. And one thing about the player himself, either his rating, his match energy or a yellow card.
- Who comes off?
Either by position, picking a group like "any defender" or a single position, or by naming specific players. You can also limit the rule to players who started.
- Who comes on?
Either leave it to your staff or name your own players in order.
Leaving the choice to your staff, or making it yourself
Leave it automatic and your staff take the best option available on the bench for the position that needs filling. Give your own list instead and they work down it in the order you set, which is the way to guarantee a specific player gets on.
The safety switch
A plan that leaves the choice to your staff carries a switch reading "Do not proceed with the change if no bench player is available for this position (including secondary positions)." Leave it on and a substitution that cannot be filled properly is abandoned rather than forced through with the wrong player. It is on by default, and it only appears on automatic plans. Name the players yourself and you have already answered the question it asks.
Plans, conditions and limits
A match plan is the rule itself: the conditions that have to be true, and the change your staff make when they are. Substitutions, red cards and instructions are all written this way.
A plan does not have to make a substitution. A team instruction plan changes your team instructions instead: the same conditions, then the new settings your staff apply when they are met.
- Substitutions per match
- 5
- Bench slots
- 7, and you may leave any of them empty
- Conditions per plan
- Up to 4, at most one from each row of the table below
Conditions you can set
| Condition | What you choose |
|---|---|
| Time | anytime, or after minute 15, 30, 45, 60 or 75 |
| Match situation | any, level, leading by 1, by 2, or by 3 or more; trailing the same |
| Player situation | rating below a value from 4.0 to 8.0, or match energy below a percentage from 5% to 95%, or he is on a yellow card |
| Who it applies to | a position group, a single position, or a named list of players |
There is also a sent off condition, which belongs to team instruction plans and lets you change how the team plays after a red card without making a substitution. Red card plans have it built in already.
When two plans want the same thing
Order decides. Plans are checked in order from the top, and when two overlap the higher one wins. Drag to reorder.
XP and progression
XP used to go to the eleven who started, and nobody else. Now everyone on the teamsheet earns it, all the way down to the seventh substitute, because being part of a matchday develops a footballer. He prepares with the team, warms up, watches from the closest seat in the ground. A young player grows on afternoons like that long before he plays a full ninety.
What a player earns
A starter who plays the full ninety sets the benchmark. Everyone else earns a share of it: a little for being in the squad, more for coming on, and more again for every minute played.
| How he was used | XP earned |
|---|---|
| Named on the bench, never came on | A small share, around 5% |
| Came on as a substitute | A share for coming on, rising with every minute to most of a full start |
| Started | A larger share for starting, rising with every minute to the full amount |
A starter earns more than a substitute over the same minutes. The place in the eleven carries weight of its own.
There are no thresholds in any of it. Every minute on the pitch earns the same as the last.
Short appearances earn more than you would think
A cameo earns more than the minutes alone suggest, because coming on earns something by itself. Ten minutes off the bench brings in around a quarter of what a full start does. Half an hour, around 40%.
And a short run-out takes almost nothing out of him: he earns his share and can leave the pitch as fresh as he came on.
Split a match between a starter and his replacement and together they earn more than one player going the distance, because each earns something for taking part.
A player who never gets on still earns match XP, slowly, where before he earned none. He turned up, after all.
Progression is even across the season now
A player's first matches of a season used to earn him more than his later ones.
That boost has been removed. XP now runs flat: a match in the run-in earns exactly what a match in week one earns.
Appearance clauses
An appearance clause is a term in a player's contract promising him a number of matches, with a penalty owed to his agent if you fall short. It counted starts, and the penalty was all or nothing. Substitutes change both halves of that.
Appearances are counted in minutes
Ninety minutes on the pitch is one appearance. Forty-five is half. The contract still reads "15 matches" and shows the equivalent in minutes underneath, so a player who has played 75 minutes so far has banked 0.83 appearances of his 15.
It does not matter how he got on the pitch. Minutes played as a substitute count exactly the same as minutes played from the start. A player brought on three times for thirty minutes each has a full appearance, the same as one who started once.
Time on the bench counts for nothing. Only minutes played.
Extra time counts
A knockout tie that runs to 120 minutes counts as 1.33 appearances, not one.
Extra time means the extra half hour of a knockout tie. Stoppage time is not counted, so a normal match is 90 minutes however long the referee plays.
The penalty scales with the shortfall
Take a clause promising a player 15 matches. Until now it was pass or fail: give him all 15 and you paid nothing, give him 14 and you paid the full penalty, the same as a club that gave him two.
And once the 15 was out of reach, the penalty was settled. Playing him more could not reduce it, so there was nothing left to gain from picking him. A clause meant to guarantee a player games could end up doing the opposite.
Now the penalty scales with how far short you fell. Give him 14 of his 15 matches and you pay a fifteenth of it. Give him 7 and you pay a little over half.
The same scaling applies on the agent's side: a small shortfall now brings a small payment instead of the full penalty.
tl;dr
Players now tire during matches
- A tired player is slightly slower, sprints less, and loses a little off his stats
- Both teams tire together, and half time restores part of it
- How much a player runs matters more than his physical rating
Match energy
Footballers tire as they play. That is all match energy is, and for the engine it is a natural next step rather than a change of direction. It arrives together with substitutions because the two belong together: tiring legs are what a bench is for.
Match energy is new. It lives inside a single match and drains as he runs, starting from whatever energy he brought with him. It is the number your substitution plans read.
What it does to a player
Match energy affects how a player performs. At 0% match energy his stats drop by around 13%, and the drop builds smoothly from zero, so there is no point where he suddenly falls off a cliff.
It also lowers the top speed he can reach and how quickly he gets there. His sprints get shorter and he needs a little longer before the next one. And he asks for the ball slightly less often.
None of this happens only to your team. The players you are up against are tiring as well, so a substitute comes on against legs that have already run an hour.
The drain rises with how hard he is working. Tactics matter too: players who press and chase the ball tire faster, so a high-pressing side empties sooner than a compact one.
So minutes are not the whole story. Two players who both played 90 will not have burned the same match energy if one of them did far more running.
What physical rating changes
Physical rating helps, but the spread is small. Take two wingers in a 4-3-3 playing against a 4-4-2, both on balanced instructions, identical in every attribute except physical. The one with 35 physical ends the match on about 61% match energy. The one with 95 physical ends on about 67%.
Run the same test on a striker and you get the same two numbers: about 61% at 35 physical, about 67% at 95. Run it on a right back and both climb, to about 69% and 75%, probably because the balanced setup asks him for fewer sprints.
So physical rating moves the number by about six points, whichever position you look at. The running the role demands moves it by more: in this test, eight points separated the right back from the winger at the same rating.
Half time
Match energy comes back at every scheduled break: most at half time, a bit less before eventual extra time, and even less in between the two extra time periods. Nobody starts the second half as empty as he finished the first.
The more energy a player has used during the match, the more the break returns, and nobody comes out of one fresher than at kickoff. There is no rest before a penalty shootout.
Reading it on the pitch
Match energy shows as a ring around the player in the match viewer, on the rating view.
| Reading | Label |
|---|---|
| 90-100% | Fresh |
| 70-89% | Showing fatigue |
| 50-69% | Tired |
| 30-49% | Worn out |
| 15-29% | Close to cramping |
| under 15% | Dead on his feet |
This is the number a substitution plan reads, and it reads the percentage rather than the label. The labels are only a quick way to see where a player is, so a threshold you set does not have to line up with them.
Energy after the match
Separately from tiring during play, the way your player's energy is worked out at full time changes.
Playing a part of a match
A substitute who comes on late gets a short run-out, not a shift. Up to around 25 minutes, that is how his body treats it too: his energy at full time is no lower than when he came on, and if he was carrying fatigue he recovers a little instead.
Past 25 minutes the workload becomes real and he starts using energy, a little more for every extra minute, up to the full cost of a match at 90.
| He plays | At full time |
|---|---|
| 10 minutes | Recovers a little |
| 25 minutes | Finishes as he started |
| 45 minutes | Uses about a third of a full match |
| 65 minutes | Uses about 60% of a full match |
| 90 minutes | Uses a full match |
The bench and rest
A player you leave out of the squad gets a full rest, exactly as today: a full rest recovers 65% of his missing energy when the match ends. A player you name on the bench and do not use spent that afternoon differently. He travelled with the team, warmed up, and stayed ready to come on until the final whistle. That is not a day off, and his body does not treat it as one. He gets around 60% of a full rest.
Training gives it back. A group set to low intensity returns 20% of a player's missing energy every morning, and it compounds. A player sitting on 70% is back to 90% after five low sessions, and it only slows those days' development by a fifth. Energy you do not get back overnight, you get back over the week.
Extra time counts now
Until now a 120 minute tie drained the same energy as a 90 minute one. Now the drain keeps climbing past 90.
| Minutes | Energy lost |
|---|---|
| 90 | 100% of a full match's loss |
| 100 | 111% |
| 110 | 122% |
| 120 | 133% |
Past 90, every 10 extra minutes adds about 11% of a full match's loss, a gentler rate than the minutes before 90.
This is the extra half hour of a knockout tie, never stoppage time.
What has not changed
The energy a full match takes is unchanged. It still runs off physical rating for outfield players and goalkeeping rating for keepers, and players in their last three years before retirement still tire faster and rest worse. Energy still cannot fall below 15%.
The lineup rule is unchanged too. If five or more of your starting eleven are below 60% energy, that lineup is rejected, and bench players are never counted towards it.
Minutes played decide most of what a player carries into his next match. Training intensity is the one lever you set yourself on top of that, over on the Custom Training tab.
tl;dr
Plan for red cards in advance
- Choose who makes way and who covers the sent-off position
- Or answer with a tactics change instead of a substitution
- The replacement uses one of your five changes
Red card plans
Going down to ten used to be something that happened to you. You watched the shape fall apart and hoped.
Now you have already answered it. A red card plan settles one question before kick-off: when a player is sent off, who makes way and who fills the hole. Lose a centre back in the tenth minute at 0-0 and lose one in the eightieth at 2-0 up, and your team handles them differently, because you said so.
Writing one
A red card plan is three questions: when it applies, which sending-off it covers, and what change your staff make.
- When?
Time and match situation. You might reorganise differently at 2-0 up in the eightieth minute than at 0-0 in the tenth.
- Who gets sent off?
Either a position group or a named list. This lets you react one way to losing a centre back and another to losing a striker.
- What change?
Choose who makes way, by position or by name, then who comes on. Either leave the choice to your staff or give your own order.
The change a red card plan makes uses one of your five substitutions.
Or change how you play
A substitution is not the only answer to a red card. Team instruction plans, the plans that change your team instructions instead of making a substitution, now take a sent off condition of their own, so you can change the way your team plays the moment you go down to ten without touching the bench at all.
Drop deeper, sit more compact, ease off the pressing, go more direct. Whatever you would have shouted from the touchline, you can set in advance and have it applied the moment the card comes out.
That gives you two separate tools for the same moment. A red card plan reshapes the players still on the pitch. An instruction plan changes how they play. Nothing stops you running both.
tl;dr
Underneath it all
- A reworked engine: fewer turnovers, off-ball movement that follows your instructions
- Team instructions with more effect, five levels instead of three, plus an expert mode slider
- New views for passes, shots and touches, sharper heat maps, stadium sound, commentary in your language
Match analytics
The tools for reading a match, live or afterwards, have been reworked on their own. Two of them are new views entirely.
Sharper heat maps
The colour scale has been recalibrated so red appears only where activity was well above the rest of the pitch. Hotspots stand out at a glance.
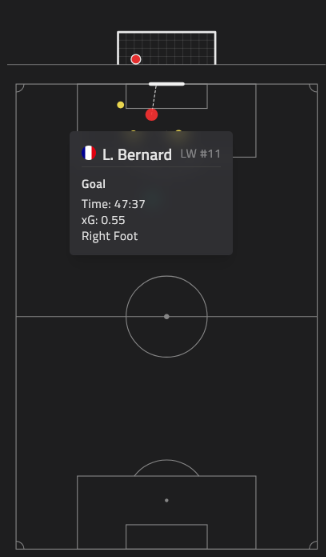
Shots, in three dimensions
Hover a shot and you get its height, its trajectory, and where it was blocked or saved. You can tell the one that flew over from the one that was kept out on the line.
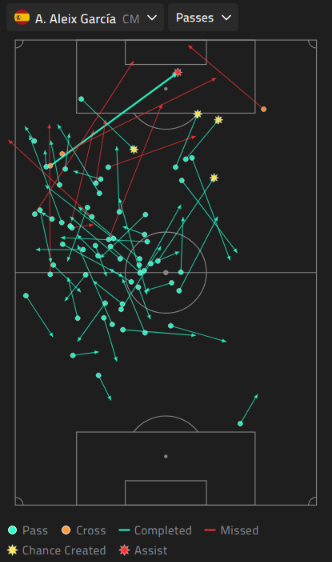
A pass map
New view. Every pass a player made across the match, where it went and whether it found its man, with chances created and assists marked.
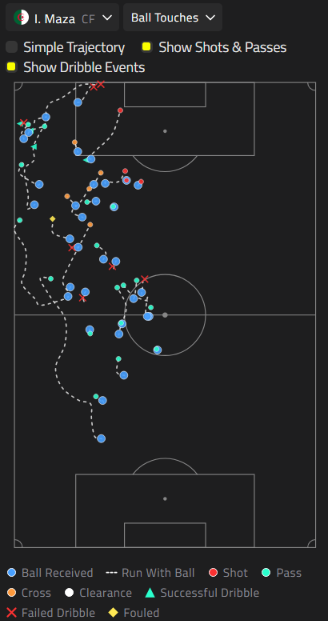
Ball touches
New view. What a player did with the ball each time he got it: carries, dribbles won and lost, shots, clearances, fouls drawn.
Sound and commentary
Matches have sound now. Stadium ambience, chants, the woos and the boos, the ball being struck. It is a different thing to watch.
Every sound can be switched off individually.
Commentary in your language
The commentary has been rewritten with new conditions, so the lines track what is happening on the pitch more closely. It now also appears in whatever language you have the app set to.
Team instructions
You already set team instructions today: how high to sit, how wide to spread, how hard to press. Season 17 changes what happens when you do, in three ways.
More weight behind every setting
Each instruction now shifts how your team plays a little more than it did, so the difference between two setups is easier to see on the pitch.
Five levels instead of three
Each instruction moves from three options to five. The steps between settings are smaller, so you can get closer to what you want.
Expert mode
If five steps are still not fine enough, expert mode replaces them with a slider and lets you tune each instruction by hand.
The match engine
Underneath all of it, the engine itself has changed. The headlines are fewer turnovers and off-ball movement that follows your instructions more closely.
- Ball carriers let go of it. The main cause of turnovers in the old engine was that a player who had passing options would drive forward instead, run out of them, and lose the ball. He now passes while the option is there. Turnovers still happen, just far fewer of them.
- Off-ball movement reflects your width. Your feedback showed movement was focused on finding open space regardless of a narrow or wide setup, so the width instruction made little difference. Players also look for combinations and one-twos now, so attacks vary more.
- Defenders read runs better and anticipate where an attacker is going rather than where he is.
- Free kicks deep in your own half get a teammate offering a simple option, instead of forcing a risky long ball when your tactics never asked for one.
- Jumping takes a moment. Players have to plant and jump for a high ball rather than springing instantly. Small, but it looks right.
- The ball spins as it rolls. Purely visual.
Fixed
- A clearance that sets up a goal now counts as an assist. Until now those passes earned nothing, which mostly cost keepers credit for goals they started.
- Players no longer visually teleport when a movement covered too much ground in too little time.
Features in development. Values are current design targets and may be tuned before release.